
Matomo is the only analytics platform that gives you full control over your data and more:
- Free open-source software
- 100% data ownership
- User privacy protection
- User-centric insights
- Customization and extensible
- Easy to use
- No data limits
This tutorial will help you get started with Matomo with DigitalOcean as your server.
Buy a Domain
It cost me $1 to buy arsiamons.space on Namcheap. You’re going to need a domain to create a free Let’s Encrypt SSL certificate.
Change the nameservers for your domain to the following (Namecheap directions):
- ns1.digitalocean.com
- ns2.digitalocean.com
- ns3.digitalocean.com
Next go to DigitalOcean and under manage, go to Networking. This is where you’ll add your domain.
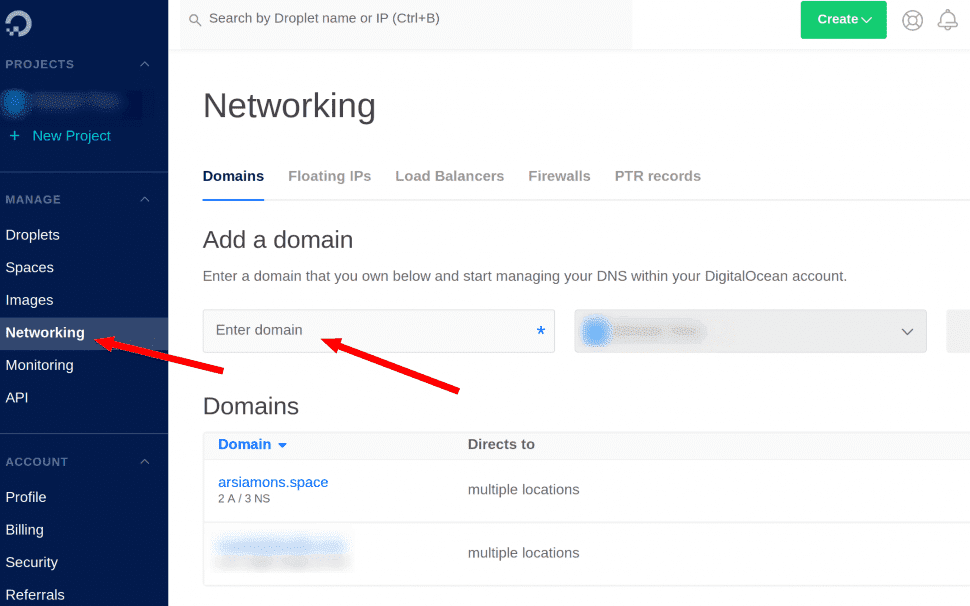
Add two A records with the following information.

Server Setup
Start with a $5 a month DigitalOcean droplet. You can increase this later if you’d like. Choose Ubuntu as your distribution. Feel free to choose any datacenter region and additional options if you’d like.
While not required, it does make things a lot easier and more secure if you setup an SSH key. If you don’t set this up, you’ll receive an email with your password to login via SSH.
Going forward feel free to use your own terminal or go to your droplet on DigitalOcean > Access > Launch Console. You’ll be entering commands into here. Your login is root.
First do: apt-get update
Then: apt-get upgrade
Press and enter Y if you’re prompted for it.
Keep the default option here and continue.
Next we’re going to install PHP 7, MySQL, Apache, and a few PHP extensions.
sudo apt-get install php7.0 php7.0-curl php7.0-gd php7.0-cli mysql-server php7.0-mysql php-xml php7.0-mbstring unzip apache2 libapache2-mod-php7.0
You’ll be promoted to create a MySQL password for root. Create a strong password.
MySQL
Login to MySQL with
mysql -u root -p
Next we’re going to create a database.
CREATE DATABASE matomo;
Next we’re going to create a user and password for it.
CREATE USER 'matomouser'@'localhost' IDENTIFIED BY 'strong-password-goes-here';
We’ll need to give the user the proper permissions.
GRANT SELECT, INSERT, UPDATE, DELETE, CREATE, DROP, ALTER, CREATE TEMPORARY TABLES, LOCK TABLES ON matomo.* TO 'matomouser'@'localhost';
Now just type exit if you’re still in MySQL.
Setting Up Virtual Hosts
Create a virtual host file with the domain you purchased earlier and edit it.
sudo nano /etc/apache2/sites-available/your-new-domain.com.conf
Use the following configuration.
<VirtualHost *:80>
    ServerAdmin admin@example.com
    ServerName your-new-domain.com
    ServerAlias www.your-new-domain.com
    DocumentRoot /var/www/html
    ErrorLog ${APACHE_LOG_DIR}/error.log
    CustomLog ${APACHE_LOG_DIR}/access.log combined
</VirtualHost>
Enable it with
sudo a2ensite example.com.conf
Disable the default configuration.
sudo a2dissite 000-default.conf
Let’s Encrypt
Install Certbot
sudo add-apt-repository ppa:certbot/certbot
sudo apt-get update
sudo apt install python-certbot-apache
A series of steps will come up to insert your domain, email address, and accept their terms of service.
Installing Matomo
Download and unzip it with:
cd /var/www/html && wget https://builds.piwik.org/piwik.zip && unzip /var/www/html/piwik.zip
Before we continue, let’s remove the useless files.
rm *html *zip
Make sure the correct permissions are in place.
chown -R www-data:www-data /var/www/html/piwik
Start Apache if it’s not already started. If it’s already started, restart it.
sudo service apache2 start
sudo service apache2 restart
Start the installation of Matomo by going to http://your-domain/piwik/index.php

Click next till you reach step 3.

The next few steps are self-exploratory but if you have any questions, please feel to comment below.

